Street Trees for Cypress Isles
August 2001
Jean Thomsin, University of Florida Master Gardener in Orange County
[Home]
Introduction
The street trees in Cypress Isles are Drake Elms (Ulmus parvifolia 'Drake') a cultivar of the Chinese
Elm (Ulmus parvifolia). Since the demise of the popular American Elm due
to Dutch Elm Disease (DED) the Chinese Elm, which is resistant to DED, is
the preferred elm in the USA. However, in part due to the clayey soil in
Cypress Isles the approximately 140 Drake Elms, planted some 3 to 7 years
ago in the 6.5 feet wide lawn areas between the street and the side walk,
have a tendency to topple in high winds and generally don't do well.
Therefore a study has been made to suggest alternative trees and advise
on the proper planting and maintenance of trees in general and the existing
Drake Elms as well. More than one type of tree has the advantage that we
do not depend on one particular tree in the future. This is in line with
modern arborists, who recommend a mixture of trees rather than numerous
trees of the same species along the streets in a neighborhood to avoid the
pitfalls of monoculture. If ever a certain disease or other problem arises
with a particular tree, the others are usually spared.
To ensure the best chance of root formation and survival in our type of
soil it is recommended to plant young trees with a trunk diameter of 2 inches
maximum (see also 'Selecting Trees' below) and digging the planting hole
well through the clay layer. The top quarter to third of the root ball should
be planted higher than the surrounding soil and irrigation managed accordingly
(see 'Planting Trees' below).
Alternative trees for street planting
Using the listing "Recommended Trees for Central Florida" from
the Orange County Extension Service a compilation of 14 trees suitable as
street trees was made. After studying the specifics of each of the 14 trees
in other references (books and the internet), and after omitting invasive
trees and trees with berries (messy) the a list of 3 to 6 recommended was
left.
If the existing Drake Elm trees die, for whatever reason, the homeowners
can choose to replace it with one of the following 5 trees. (In order of
best chance of survival)
1. Live Oak (Quercus
virginiana) (stronger than Laurel Oak)
2. Winged Elm (Ulmus
alata) (native tree, roots well)
Less suitable trees but OK are:
3. Laurel Oak (Quercus
hemisphaerica) (needs good drainage, does not like wet soil)
4. Red Maple (Acer rubrum
'Florida Flame') (needs a damp soil)
5. Allee Elm (Ulmus parvifolia
'Allee') (nice shape, but as shallow rooted as the Drake Elm)
The Allee Elm is the better tree of the two Chinese Elms. It has a nice
upright appearance and needs less pruning. However, it is as shallow rooted
as the existing Drake Elms.
For further details see also the attached sheet "Recommended Street
Trees for Cypress Isles".
Recommended Tree Nurseries
· Flowering Tree Growers, Inc., 14201 Tilden Road, Winter Garden,
(407) 656-3912
· The Apopka Forest, 4055 Plymouth-Sorrento Road, Apopka, (407) 889-0207
· Green Images, 1333 Taylor Road, Christmas, (407) 568-1333 (Native
Trees!)
Selecting Trees
 Tree selection begins with choosing a species appropriate to your planting
site. However, site conditions and maintenance capabilities will also dictate
other choices, such as the size of the tree to plant, its root ball characteristics,
the method by which it was grown and the tree's structure. Trees must also
be selected for quality. Quality factors to evaluate include root ball size
and structure, trunk form and strength, branch structure and evidence of
injury, disease or poor cultivation methods.
Tree selection begins with choosing a species appropriate to your planting
site. However, site conditions and maintenance capabilities will also dictate
other choices, such as the size of the tree to plant, its root ball characteristics,
the method by which it was grown and the tree's structure. Trees must also
be selected for quality. Quality factors to evaluate include root ball size
and structure, trunk form and strength, branch structure and evidence of
injury, disease or poor cultivation methods.
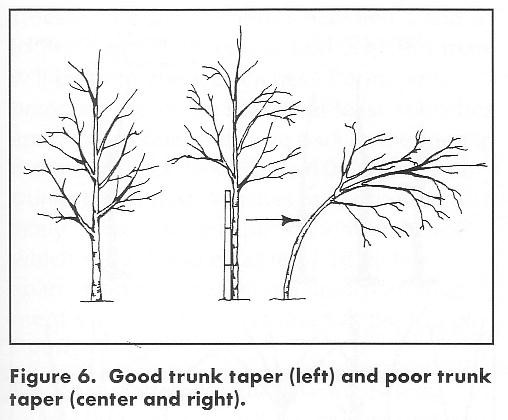
Strong trunks are thickest near the ground and taper up (see Fig. 6). They
do not require stakes to support them. Trees that were staked overly long
at the nursery may not develop proper trunk taper and may fall over when
stakes are removed. Single trunk trees are usually considered stronger than
their multi-trunk counterparts and are more durable in the landscape. A
tree that will grow to be more than 40 feet tall should have a single trunk
well up into its canopy, but the trunk does not have to be arrow straight.
A tree that forks in its top half should have one of the trunks removed
before planting. If the trunk forks in the lower half than the tree should
not be used. Trees with a single trunk are usually more appropriate for
planting along streets and near walks and are also easier to train so those
branches grow well overhead of vehicles and pedestrians. Branches should
be distributed along the trunk and not clumped toward the top. Branches
in the lower half of the tree help distribute the stress placed on the trunk
when the wind blows. At least half of the foliage should originate from
branches on the lower two-thirds of the tree. Look for pests, disease or
injury. Don't purchase trees with scales, spider mites, lacebugs, etc. Be
sure a tree's root ball is free of weeds before planting. Weeds will slow
the establishment rate of the tree and may spread out into the surrounding
landscape.
The following table outlines the criteria for a smaller (trunk to 2"
in diam. at 6" from the root ball) versus a larger tree:
| CRITERIA |
SMALL (up to 2") |
LARGE (2" +) |
| Landscape establishment period |
Quick |
Slow |
| Irrigation period after planting |
Breif |
Extended |
| Susceptibility to drought |
A breif period after planting |
Very sensitive for a long time |
| Cost of nursery stock |
Inexpensive |
Expensive |
| Pruning needs |
High |
Moderate |
| Suitable for compacted or poorly-drained sites |
Well-suited |
Could be poorly suited |
Planting Trees
 Never pick up a tree by the trunk; always lift and carry it by the root
ball. Never drop a tree. Transport the tree carefully avoiding high winds
and temperatures. Irrigate the tree before loading. If trees can not be
planted the day they arrive a shaded and wind protected holding area is
needed. Continue the irrigation as in the nursery, which is daily for container-grown
trees. Remove plastic ASAP. The roots of bare-root trees should be covered
with moistened burlap and kept in the shade prior to planting.
Never pick up a tree by the trunk; always lift and carry it by the root
ball. Never drop a tree. Transport the tree carefully avoiding high winds
and temperatures. Irrigate the tree before loading. If trees can not be
planted the day they arrive a shaded and wind protected holding area is
needed. Continue the irrigation as in the nursery, which is daily for container-grown
trees. Remove plastic ASAP. The roots of bare-root trees should be covered
with moistened burlap and kept in the shade prior to planting.
Trees must be planted at the right depth and receive the right amount of
water if they are to establish themselves and flourish. In well-drained
soil the planting hole should never be dug deeper than the height of the
root ball. This means that the soil at the bottom of the hole is left undisturbed.
The topmost root in the root ball should be level with the soil surface.
The planting hole should be at least two times and preferably five times
wider than the root ball.
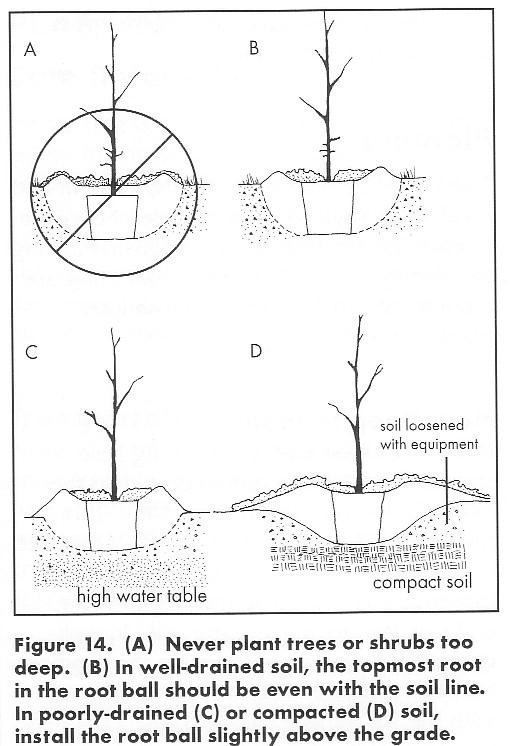
In poorly drained or compacted soil, take extra precautions to ensure that
roots are not suffocated by the water saturation typical of these soils.
The top quarter to third of the root ball should be planted higher than
the surrounding soil (see Fig 14 C/D) and irrigation managed accordingly.
Dig the planting hole only two-thirds the height of the root ball and, after
planting, mound soil to create a gentle slope down from the top of the root
ball. The planting hole and resulting mound should be at least five times
wider than the root ball. This will help prevent the top portion of the
root ball from becoming saturated during rain or irrigation and will keep
at least that portion of the root ball above standing water at all times.
The top of the root ball may dry out quickly in summer on some sites, so
be prepared to irrigate accordingly. Consider planting a low-profile root
ball on a poorly drained site. Loosening the compacted soil before planting
can dramatically increase the rate of root growth and root penetration into
the landscape soil. Establishment time is sped up, reducing the time of
the tree's vulnerability to pests, disease and drought.
Trees grown in plastic or other hard-sided containers can be removed from
their containers and placed directly in the hole. Cut any circling roots
so that they will not strangle the tree later on. If a tree is pot-bound,
use pruning shears or a serrated knife to make slices 1 to 2 inches deep
going from the top to the bottom of the root ball. Make these slices in
three or four places around the root ball and pull the roots growing along
the outside of the root ball away from the root ball.
When preparing the hole for a bare-root tree, dig it wide enough so that
the roots can be spread out. Do not bend or break the roots. Position the
topmost root just under the soil surface.
The soil used to fill in around the root ball is called backfill. Mostly
the best backfill will be the original soil dug from the planting hole.
Loosen and break up any clods of soil before back filling. Next, backfill
the bottom half of the space around the root ball. Tamp the soil lightly
with your foot, but not so heavily that the soil is compacted. Finish filling
the hole with loose un-amended soil, and gently tamp again. Settle the soil
by pushing a hose with running water in and out of the backfill soil all
around the hole. Finally, form a three-inch high water ring around the perimeter
of the root ball. This will help hold irrigation water.
Little if any pruning should be necessary at the time of transplant. Trees
with poor structure should be pruned at planting to correct the problem,
especially if no further pruning is planned for the next year or two.
In Florida, container grown or hardened off balled-in-burlap trees may be
planted year round.
Care during establishment
Even the healthiest trees planted in the most ideal circumstances need a
substantial amount of time, care and, particularly proper irrigation to
become established. During the establishment period, roots are expanding
out into the landscape soil, and shoots and trunk grow more slowly than
they did before transplanting. Once shoot and trunk growth rates match the
rates before planting, the tree is considered established. An established
tree has developed a root system substantial enough to keep it alive without
supplemental irrigation. If supplemental irrigation is halted too soon,
the mortality rate for container grown trees will be higher than for hardened
off field-grown trees. In addition to requiring special attention to irrigation,
trees in the establishment period need mulching and may require staking.
Pruning and fertilization are also handled in specific ways during the establishment
period.
The following table shows establishment periods and irrigation schedules
in well drained soils.
| Trunk diameter Nursery stock |
Establishment (months) |
Number of anchor stakes |
Irrigation schedule |
| Under 2" |
3-6 |
2-3 |
1x/d 2 months, 3x/wk 3 months, 1x/wk until established. |
| 2" to 4" |
6-12 |
3 |
1x/day 3 months, 3x/wk 4-5 months, 1x/wk until established. |
| Over 4" |
12+ |
3-4 |
1x/d 4-5 months,3x/wk 5-7 months,1x/wk until established. |
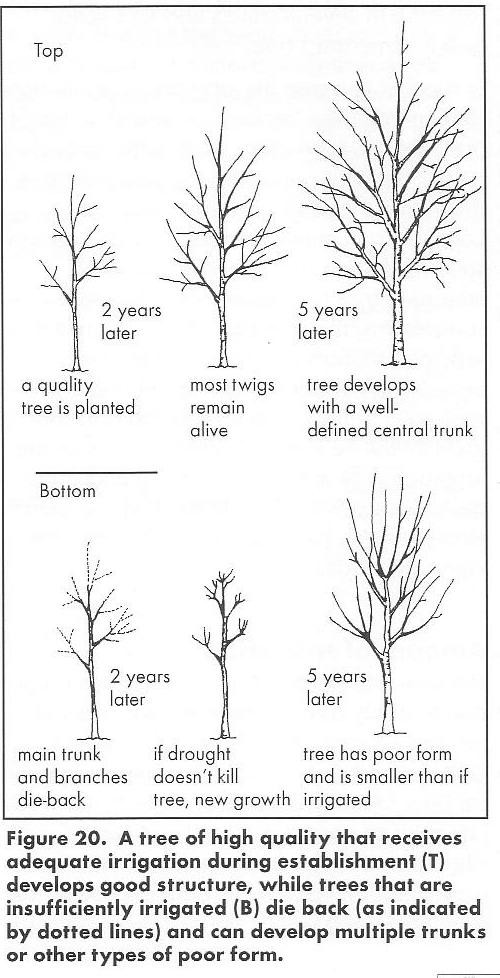
Irrigation (see also table above and Fig
20 below)
When trees die, blame is often placed on pests, disease, or the plants themselves.
The truth is that many trees die from too little or too much water during
the first few months after planting. Trees are likely to get too little
water in well-drained soil and too much in soil that is poorly drained.
In the first few months after planting, do not skip irrigation because of
rainfall, unless it measures over an inch. The irrigation in the table above
is for well-drained soil. However, in poorly drained soil, such as in Cypress
Isles, a set irrigation schedule may be impractical. Instead, monitor the
site for changes in moisture levels caused by rainfall or, possibly, run-off
from adjacent irrigation. Essentially, the root balls of newly planted trees
must not be allowed to dry out nor must they be saturated. As was mentioned
before planting a tree higher than the surrounding soil in poorly drained
soil will help. Trees mistakenly planted too deeply in poorly drained soil
should not be irrigated until they are raised and replanted.
To determine whether the amount of water being supplied is adequate for
the site conditions, conduct the following tests. Within the first week
after planting, gently dig a small hole in the loosened backfill soil just
outside the root ball and half its depth several hours after watering. Squeeze
soil taken from the bottom of the hole in the palm of your hand. If water
drips out between your fingers, you are watering too much; if soil crumbles
and falls out of your hand as you open your fingers, you are watering too
little. If soil stays together, moisture in the backfill soil is just right,
but the root ball might be bone dry. Poke a finger into the root ball to
check the moisture there. If it feels dry, increase the daily irrigation
amount. Is the soil smells sour or you can squeeze water from it, it is
too wet.
If proper irrigation cannot be provided following planting, consider planting
smaller trees (up to 2" in diameter), which establish more quickly.
Staking and Wood Supports
 There are two types of staking each used for a different purpose. Anchor
staking prevents a newly planted tree from tilting in the planting hole
when the wind blows. Such tilting will cause root ball movement and can
break roots and slow plant establishment. Support staking holds a weak trunk
in an upright position. Many trees do not require staking after planting;
don't stake a tree unnecessarily.
There are two types of staking each used for a different purpose. Anchor
staking prevents a newly planted tree from tilting in the planting hole
when the wind blows. Such tilting will cause root ball movement and can
break roots and slow plant establishment. Support staking holds a weak trunk
in an upright position. Many trees do not require staking after planting;
don't stake a tree unnecessarily.
Staking can be done with above ground stakes and wires and below ground
anchoring with stakes around the root ball only. Stakes should be driven
at least 24" into the ground. Often wire threaded through a short piece
of garden hose is used to secure the three to the stake. However, this system
can damage the trunk as it moves in the wind and rubs against the hose.
You must use a wide, smooth material such as one of the rubber-like products
now becoming available for this purpose. Wrap this material around the trunk
above the base of a lower branch, pull it firmly so there is no slack, and
attach it to the stake. Guys and stakes should be removed within a year
after planting. If anchor stakes are required for more than a year, there
is a problem with the tree.
Leaving small branches along the lower trunk will help the trunk increase
in diameter and strength. These branches can be removed once the tree can
support itself.
Mulching
Before applying mulch, remove any soil that may have been placed over the
root ball. Apply mulch 2 to 3 inches deep in a circle at least 2 feet in
diameter for each inch of trunk diameter. So a trunk of 2-inch diameter
requires a mulch circle of 4 feet in diameter, etc. Increase the size of
the circle of mulch as the tree grows until the tree is fully established.
This will help a tree establish quickly by reducing competition from other
plants, especially turf. A mulched soil also encourages root growth in and
under the mulch. Keep mulch 2 to 3 inches away from tree trunks to prevent
moisture from initiating bark decay and to discourage rodents.
Fertilizing
Fertilization is usually desirable when we are trying to get newly planted
trees and shrubs established. However, good irrigation is much more important
than fertilization for new trees. If you fertilize give trees a small application
of slow-release fertilizer (30 - 50% slow-release Nitrogen) 4 to 6 weeks
after planting and then two to three times per year for the following 3
years or so. Two of the annual applications are normally scheduled for March
and September. The third application can be made during the summer. These
applications should be applied to the surface of mulched and un-mulched
areas extending out from the tree's trunk to about 1 ½ to 2 times
the canopy's diameter. An example of the amount of fertilizer to be used
in an annual application is e.g. 0.24 lbs. (= 7.5 tablespoons) of 12-4-8
(N-P-K) fertilizer for a canopy of 4 feet and an area of 1.5 x 4 = 6 feet
diameter. Many fertilizers are formulated for use on lawn grasses. Some
of these, known as weed-and-feed fertilizers, may contain a herbicide that
can damage trees. It is best to not use these close to young trees. Once
trees are well established (3 to 5 years after transplanting) they will
not need additional fertilizer if they are growing in a landscape where
turf and shrubs are fertilized.
Pruning During and After Establishment
Pruning at the time of planting has little if any positive impact on post-transplant
survival or growth. If a tree has good structure at the time of planting,
pruning should not be required for several years. Trees with minor structural
problems such as a double header in the top half, or dead, diseased, rubbing
or broken branches can be pruned at planting to correct the problem. If
poor quality trees were planted, the costs of pruning to develop good structure
during the establishment period may outstrip the cost of purchasing and
planting trees of good quality.
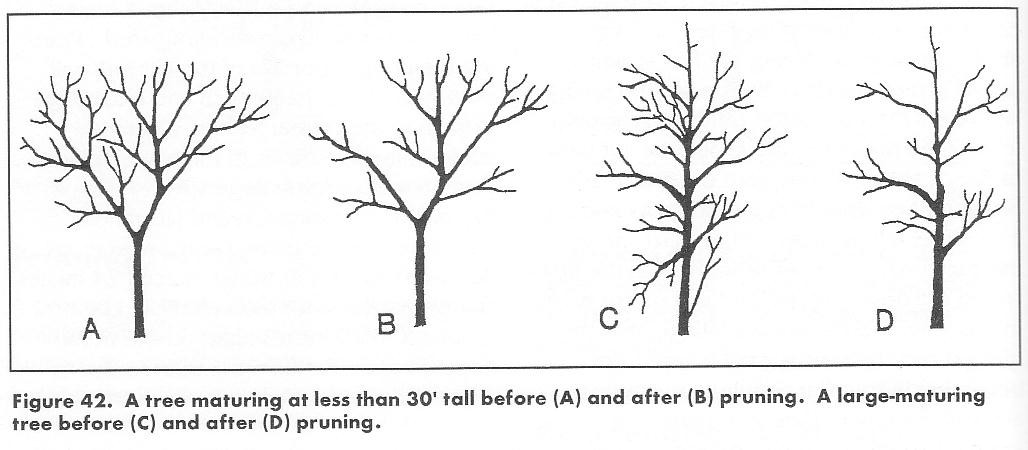
On trees, encourage a single central trunk to develop by removing competing
upright trunks or branches. Begin this process after about 1 year or at
least within the first 2 to 3 years. Tree training continues for 10 or more
years on large maturing species. Frequent light pruning several times each
year encourages faster growth and prevent undesirable sprouting. Several
light prunings are preferable to one heavy pruning each year. This light
pruning can be done anytime. Heavier pruning can best be done late in the
dormant season or several weeks following a growth flush. Trees sprout excessively
and are easily damaged when pruned during active shoot elongation. The worst
times to prune are when leaves are forming or when the tree is under stress.
Some trees such as elms ooze sap from pruning wounds and should be pruned
preferably during late fall or early winter. Redbud and Magnolia should
be pruned after flowering, but before flower buds form for the next year's
bloom.
There are two pruning techniques: Thinning and Heading back (or pinching).
Thinning is the complete removal of branches back to the lateral branch
or the main trunk. Heading back is the selective cutting of the ends of
twigs or young branches back to a bud or node. In this case a number of
shoots and leaves result, producing a denser plant. Heading back that involves
using thumb and forefinger to remove the tips of branches is referred to
as pinching.
Thinning can give a tree or plant an open appearance. If a tree is lightly
thinned, interior shoots are not likely to develop. Prune in such a way
as to enhance and encourage the natural shape of the tree. First remove
dead, diseased or broken twigs and branches. Now study the tree's form and
select the best-spaced and positioned permanent branches, removing or shortening
the others. Permanent branches should be spaced 6 to 24 inches on the trunk,
depending on the mature size of the tree. Remove fast growing suckers that
sprout at the base of and along tree trunks or on large, interior limbs.
To prune a young tree to a single leader (the stem that will become the
trunk), locate the straightest and best leader to retain. In shaping the
tree crown, remove lateral branches that are growing upright. They will
compete with the leader and form a weak, multiple leadered tree. There should
be no branches leaving the trunk at an acute angle or narrow forks either
between branches or between a branch and the trunk. When training a young
tree, prune back those branches below the lowest permanent branch to 8 to
12 inches from the trunk. These are temporary branches. Remove any lower
branches that are larger than ¼ inch in diameter. By keeping the
smaller-diameter branches on the trunk, the tree will grow faster and develop
a thicker trunk. The trunk will also be better protected from sunburn and
vandalism or accidental damage. Remove the temporary branches when the trunk
approaches 2 inches in diameter (measured 6 inches from the ground).
References
1. 'Your Florida Landscape' by Dr. Robert J. Black and Dr. Kathleen C. Ruppert
- University of Florida 1995
2. 'Southern Trees' 2nd edition - University of Florida and the USDA Forest
Service 1996 (CD-ROM)
3. 'Recommended Trees for Central Florida' by Orange County Extension Service
and the Florida Division of Forestry.
4. Searching the Internet (using Botanical Names) will yield many sites
with pictures and further details of the trees.
(E.g. a good site is www.nobleplants.com/classnotes/fall/fallprofiles/images)
[Home] [Back to Architectural Review Page]
This page was updated 8/23/2001